Bike Errands / Bike Video

I found a cool mini clamp and ball head rig that is just right for attaching my Olympus Stylus camera to my bike handlebars. I did a test today and it worked great, taking a video of most of my trip to and from an errand this morning. I edited it down from 20 minutes. I’m glad that because it is far enough ahead of me you can’t hear me breathing, just road noise and wind from the bike moving.

Here it is:

This is a test of the bike mount I got for my Olympus Stylus camera. I edited it down from about 20 minutes. I was heading out to get some scissors sharpened.


Software Project Python 2to3 continued... Wow, such bugs...

The process of converting the editor ( https://github.com/jpfxgood/ped ) to Python3 and writing tests is going well. I am fixing a LOT of minor bugs and edge conditions that don’t really come up a lot in my normal use of the editor but are very evident doing detailed test cases. I came up with some cool ways to test features that are only available interactively by using the keyboard macro feature of the editor to feed the required interaction to the editor main processing loop. It reminds me of testing 1-2-3 for DOS where virtually all of the testing was done with keyboard macros and screen comparisons. It also tests the macro feature, and it already helped me fix a hidden bug in the macro feature where it was accumulating null characters when no key was being pressed. If one left macro record on it would have eventually sucked up all of the heap memory, though I guess it would have taken a while on modern machines. I may have to refactor the main test function since it is getting pretty long, I’ll see where it’s at when I finish.

Oh and running pytest inside VSCode is wonderful for debugging both the code under test and the test automation at the same time.

Here’s the simple launch config that I use:

{
    // Use IntelliSense to learn about possible attributes.    
    // Hover to view descriptions of existing attributes.    
    // For more information, visit: https://go.microsoft.com/fwlink/?linkid=830387
    "version": "0.2.0",
    "configurations": [
        {
            "name": "Python: Current File",
            "type": "python",
            "request": "launch",
            "program": "${file}",
            "console": "externalTerminal"
        },
        {
            "name": "Python: Pytest",
            "type": "python",
            "request": "launch",
            "module": "pytest",
            "console": "externalTerminal"
        }
    ]
}

If you want to watch the tests run I have this handy screen recording:


Bike rehab project... finale, and next...

I’ve been doing rides and errands on the bike for the last couple of weeks and making minor adjustments. I got the derailleurs dialed in so that there is no skipping or slipping. The bike is great for errands, the cargo net that I got for the back rack works perfectly keeping even odd shaped things safely in place. After a series of rides last week I realized due to pain in my rear end that my old body needed a better seat than the stock Trek mountain bike seat. I got a Terry ( http://www.terrybicycles.com/Saddles ) gel saddle for men, the one made for recreational riding. If you ever need a bike saddle for either a woman or a man, Terry are the best. I just installed it today and the test ride was a huge improvement. Also reinstalling the seat gave me a chance to adjust it’s position front to back and that also helped, I had noticed that I was pushing way back on the seat while pedaling; now I can pedal comfortably in a normal seated position. In any case here is the today “final” picture:

My wife likes what I’ve done with my bike and she’d like me to rehab her bike as well… so that is what is next. It “should” go quicker, I have ordered all of the parts at the same time and I already have the required tools. Her bike is a Specialized Rockhopper probably from around 1995 or so. It has slightly nicer drive components on it than mine but otherwise very similar. Here is the before picture:

I’ll post about progress once all the parts get in.

Software Project Python 2 to 3 continued... so many bugs...

Well, it has been good writing tests for the converted editor code ( wip is here: https://github.com/jpfxgood/ped/tree/master/2to3out ) as it has also shown up a bunch of existing bugs and nits and stuff that was just appearing to work but wasn’t… Plus I got to figure out a nice way to test both the internal editor logic and the rendering at the same time. I’ve been using Microsoft’s VSCode to debug things because it can do it in a detached terminal, very handy for a curses based application like the editor.

I’ve also made some decisions about removing some features that I don’t use anymore ( and I don’t think anyone else would use either, an AIM IM integration, nntp client, svn browser… see… you don’t want those ) and I don’t really want to test them or get them working. So those came out of the code as well, the editor will be much lighter.

pytest is pretty robust I must say, it is handling test code with nested functions without batting an eye, it even shows the nesting in the test failure output… very nice. Anyway onward to hopefully finish the core editor classes in the next couple of days.

Software Project Python 2 to 3 conversion for my scripts...

I’ve got a bunch of python scripts that I have written over the last eleven years or so. I have published some of them on github here: https://github.com/jpfxgood Probably the most sophisticated is the editor ped (python editor) that I wrote originally back in 2009 and have been working on ever since. Over those years I was pretty busy as a professional programmer and managing software engineers in ever larger groups. I snuck in the work on these scripts when I had the time to focus. A couple of things just didn’t get done as part of that, I never wrote proper tests, and I ignored the looming end of life for Python 2 and the migration to Python 3.

Well, now I have the time so I’ve started on both projects. First I brought the github projects up to date, truth be told I use svn locally because it is what I was used to. After this project github will be the canonical version of these scripts. Then I used the 2to3 script to do the rough conversion to Python 3 into a new temporary subdirectory “2to3out”. The script does a decent job, but it was still a surprise that division suddenly works differently… Also some of the code around reading and writing “utf-8” encoded files need to be tweaked. The differences between byte streams and character streams came up in several places. A few miscellaneous changes to the signatures of imported modules and functions had to be corrected. In general the changes beyond what the script converted were small.

The testing was the real problem. As I went through and manually tested each feature of each script I found a number of bugs, most of those bugs were unrelated to the 2to3 conversion, they were simply things I’d never really tested before. So as I got to the point that I was fixing more and more of these I decided that now was the time to bite the bullet and do penance for my past sins and write a regression test suite for these projects.

I liked pytest in the past, it is simple, doesn’t require any intrusive changes, is flexible, and I’ve used it before. So, after a few minutes reviving the brain cells that used to know about pytest I started on a tests folder and a set of test suites for each module in the scripts. I started with the editor first since it is the most complex. I’ll probably do the backup script after that since the fixtures to test it are going to be interesting to implement.

I’ve got a few cases written already and I do thank my past self for refactoring the editor multiple times over the years to make the internals pretty modular and independent. Apparently they screwed with the regular expression module as well as I’m getting Deprecation warnings for many of my uses of it, sigh, I’ll have to go through and clear those up too.

Here’s the test output so far:

It is a meditative process writing tests for eleven year old code, I get to appreciate the good parts of the code and laugh at the crappy parts again.

More updates as it continues…

Bike rehab project... shift and brake cables...

The new shift and brake cables and housings (along with the cutter/crimper tool for making cables and housings) finally arrived. I was able to build new cables to fit the position of the shifters/brake levers on the new handlebars. It went pretty smooth, I got to use my new bench vice at one point to hold the shifter assembly while I pushed on the cable with some vice grips to get it to come out of the shifter. Other than that everything came apart and went back together easily.

I may still have some fine adjustments to make to the brakes so that the front and rear engage at the same handle angle and the front derailleur may need tweaking. I raised the neck on the handlebars before I started to make the fit comfortable while I was sitting more upright. The test ride went well, shifting and braking work acceptably, the riding position is a lot better, no pressure on my hands and arms and my back is relaxed.

Here is the most recent picture:

IMG_20200606_121128.jpg

Software Project Timelapse / Slides / Music

It has been overcast here so mostly taking pictures of the clouds illuminated by the light pollution… In any case I switched to a 28mm prime wide angle lens that is F 2.8 and that has improved a number of things including making the focus easier and getting a wider aperture. I tweaked the music script and also created additional sections in the music so the sound track is better. The ISO was 1600 and the exposure was 10 seconds, I think I can double the ISO so I’m going to just adjust that for the next experiment.

In any case here is the latest WiP:


Software Project Timelapse / Slides / Music

Well here is the first effort that produced images:

It is a bit overexposed due there being a lot of ambient light, this was 28 mm, F 2.8, 20 second exposure, ISO 3200. The focus isn’t good either so I’m going to work on that too. I’m thinking for the next attempt I will try cutting the exposure time and the ISO in half. And I’ll spend some more time in the setup phase on getting the focus right, just have to get used to working with the camera in the dark.

Software Project Timelapse / Slides / Music ...

I’ve been experimenting with controlling my Canon 6D using Linux and using it to capture sequences of photographs in a Timelapse. A while ago I wrote a script to stitch images together into a video slideshow and also generate an improvised soundtrack to play along with them. You can see a version of this project here: ( https://github.com/jpfxgood/slides-sound ). I’m using that script to make the images into a video with a soundtrack.

The camera control software comes from the gphoto2 package ( thank you Linux) and some helpful instructions here: https://www.moreno.marzolla.name/software/linux-time-lapse/

Here’s a sample of the output so far:

I’m working on improvements to the generated music and I’m going to try some night sky time lapse video… more to come… ( also I need to update my github project… )


Bike rehab project... contiued...

After a few rides to reacquaint my body with the bike I realized that for a utility bike I should convert the handlebars from straight bars to swept bars that would allow a more upright riding position. I ordered some bars and they arrived. I was hoping that the existing cables would have enough slack to used on the new bars, but no it was not to be. So now I await cable kits to build new brake and shift cables with the appropriate slack for the new bars. Should be here mid-week. Here’s a preview of the new bars below:

IMG_20200531_170906.jpg

I also realized that I may need to raise the neck as well so I’ll fit the bars and the neck again before I build the cables…

Bike rehab project... Running driving bike...

Update below at 2:23 PM EST…

A flock of parts came in yesterday and so I made some rapid progress. The replacement hose and nozzle for my floor pump came in and after some violence I was able to remove the old hose and using a hose clamp fashion a replacement fitting and now I have a nice floor pump with a gauge and both presta and schrader fittings on the nozzle. My new bike lock came in and I installed the holder on the frame and programmed the new combination on it. The new tires ( very nice road/trail combination tread ) and tubes ( heavy duty puncture resistant ) came in so I was able to assemble the front and rear wheels. I managed to remember all the steps without resorting to youtube. I even replaced the rim tapes with very nice new ones, the old ones were dried out, rotten and crumpled up.

The front and rear fenders came in and fortunately since it is an old steel frame it has mounting points already on the frame for fenders and racks so it was pretty easy to get them on. I only had to modify the front one a tiny bit to make it sit high enough and still fit between the front forks and clear the tire. I was a little worried that they weren’t going to clear the tires since these are slightly larger than the original tires on the bike, 2.25 as opposed to 2.0, but not to worry they fit just fine. I had to adjust the front brake calipers so that they would clear the front tires and seat on the rim, but that was pretty simple.

I have a rack for the back of the bike but I may not get to that until later in the day or tomorrow. I took the bike out for a test run after modifying my bike helmet’s straps to fit my apparently fatter head. Apparently it is true that you don’t forget how to ride a bike, after a bit of panic when I was up high zooming down the hill it all came back to me. I will say that I am horribly out of shape and I’ll be working my way up to hill climbing bit by bit… whew.

Oh, I also got a set of rubber block pedals which work great, they’re easy to get on and off and they don’t have spikes on them that will claw you in the leg if you accidentally let a pedal whip around.

The drive train needs a good cleaning and lubrication, I have a cleaning and lube kit coming Tuesday.

Here’s a picture of the current state:

IMG_20200516_103601.jpg

Afternoon update 2:23 PM:

I got the rack installed on the back of the bike this afternoon. As with many things labeled as “universal” there was some bodging to make it fit and I had to substitute some alternate fasteners, but in the end it is on and secure. Picture below:

IMG_20200516_141309.jpg


Bike rehab project progress...

All the parts are ordered and they’re taking a while to get here, but fortunately I don’t have any deadlines to worry about, so no problem. I was able to true up the rear wheel by just tightening a loose spoke. This is great because the drive train on this old bike isn’t made anymore and it is unclear what (if any) modern drive train would be compatible if I had to swap it to another wheel.

I got the chain guard and did a bunch of modifications to make it fit on the bike, modified some brackets, cut off some metal that would have been in the way, and shortened it. In the end it came out good and I think it’ll keep my pant leg out of the chain. Since this is going to be a hop on and ride bike, the less I need to remember to get going the better, like a leg strap for example…

After removing the tires and inner tubes I realized that the rim tape was pretty dead as well so I ordered some of that. Many of the remaining parts should arrive by the end of this week so hopefully I’ll have a usable bike by the start of next week.

Here are a couple of pictures of the current status:

IMG_20200513_162847.jpg
IMG_20200513_162911.jpg


Bike rehab project...

I’d like to get back to riding my bike as a form of local transportation for errands and also just for fun and exercise. I’ve got a couple of bikes from years ago when I was riding a lot so, I’m going to try getting them working before I get into buying a new bike. I’m starting with my Trek 930 from 1994, amazingly all the cables, brakes, and derailleurs seem to work fine ( delta some cleaning and lubrication ). It needs new tires and tubes, they’re pretty dried out and I wouldn’t trust them. The rear wheel seems a bit out of true, I’m going to try truing it up since the drive train on this bike is long discontinued and if I have to upgrade it I might as well buy a new bike. The bike needs a bath as well, I’ll probably do that later today. So here’s the before picture:

IMG_20200508_113145.jpg

I also ordered some fenders, a chain guard, and a rear rack to make it more of a utility bike than a mountain bike. Once it is in riding condition I’ll see if I want to replace the handlebars.

Basement progress... Phase 2 complete...

Phase 2 went quickly since I had all the materials. Most interesting problem was trying to drive screws into the old timber in the house. Apparently after 91 years the wood gets pretty tough. In any case, there was a bit of work moving things out of the way and then realizing that the pallet that we use to keep stuff off the damp floor was going to need to be cut down to allow for the new shelves. Here is a picture of it partially framed and then finished with stuff put away. We reclaimed many square feet of floor space…

IMG_20200506_105938.jpg
IMG_20200506_125743.jpg

Of course this has generated a bunch of debris that now needs to be packaged up to be acceptable to the trash folks… But, now there is clean space to work on other projects. Next up, getting some bicycles in operating condition.

Basement progress... Phase 1 complete...

Whew, I put the plywood shelf skins on today. The most challenging part of that process was digging the sheets of plywood out of my pile of scrap wood in the garage. Remind me to be more thoughtful about what order I stack it in when I’m done with all of this… So here is the finished product for phase 1:

IMG_20200505_154216.jpg

It has allowed me to get rid of an old wheeled storage cart that was on the left freeing up floor space. Now I’ve got room to spare and everything is well separated from the sometimes damp floor. On to phase two tomorrow, on the other side of the room. Have to clear a bunch of stuff out of the way to get there.

Basement progress... Framing...

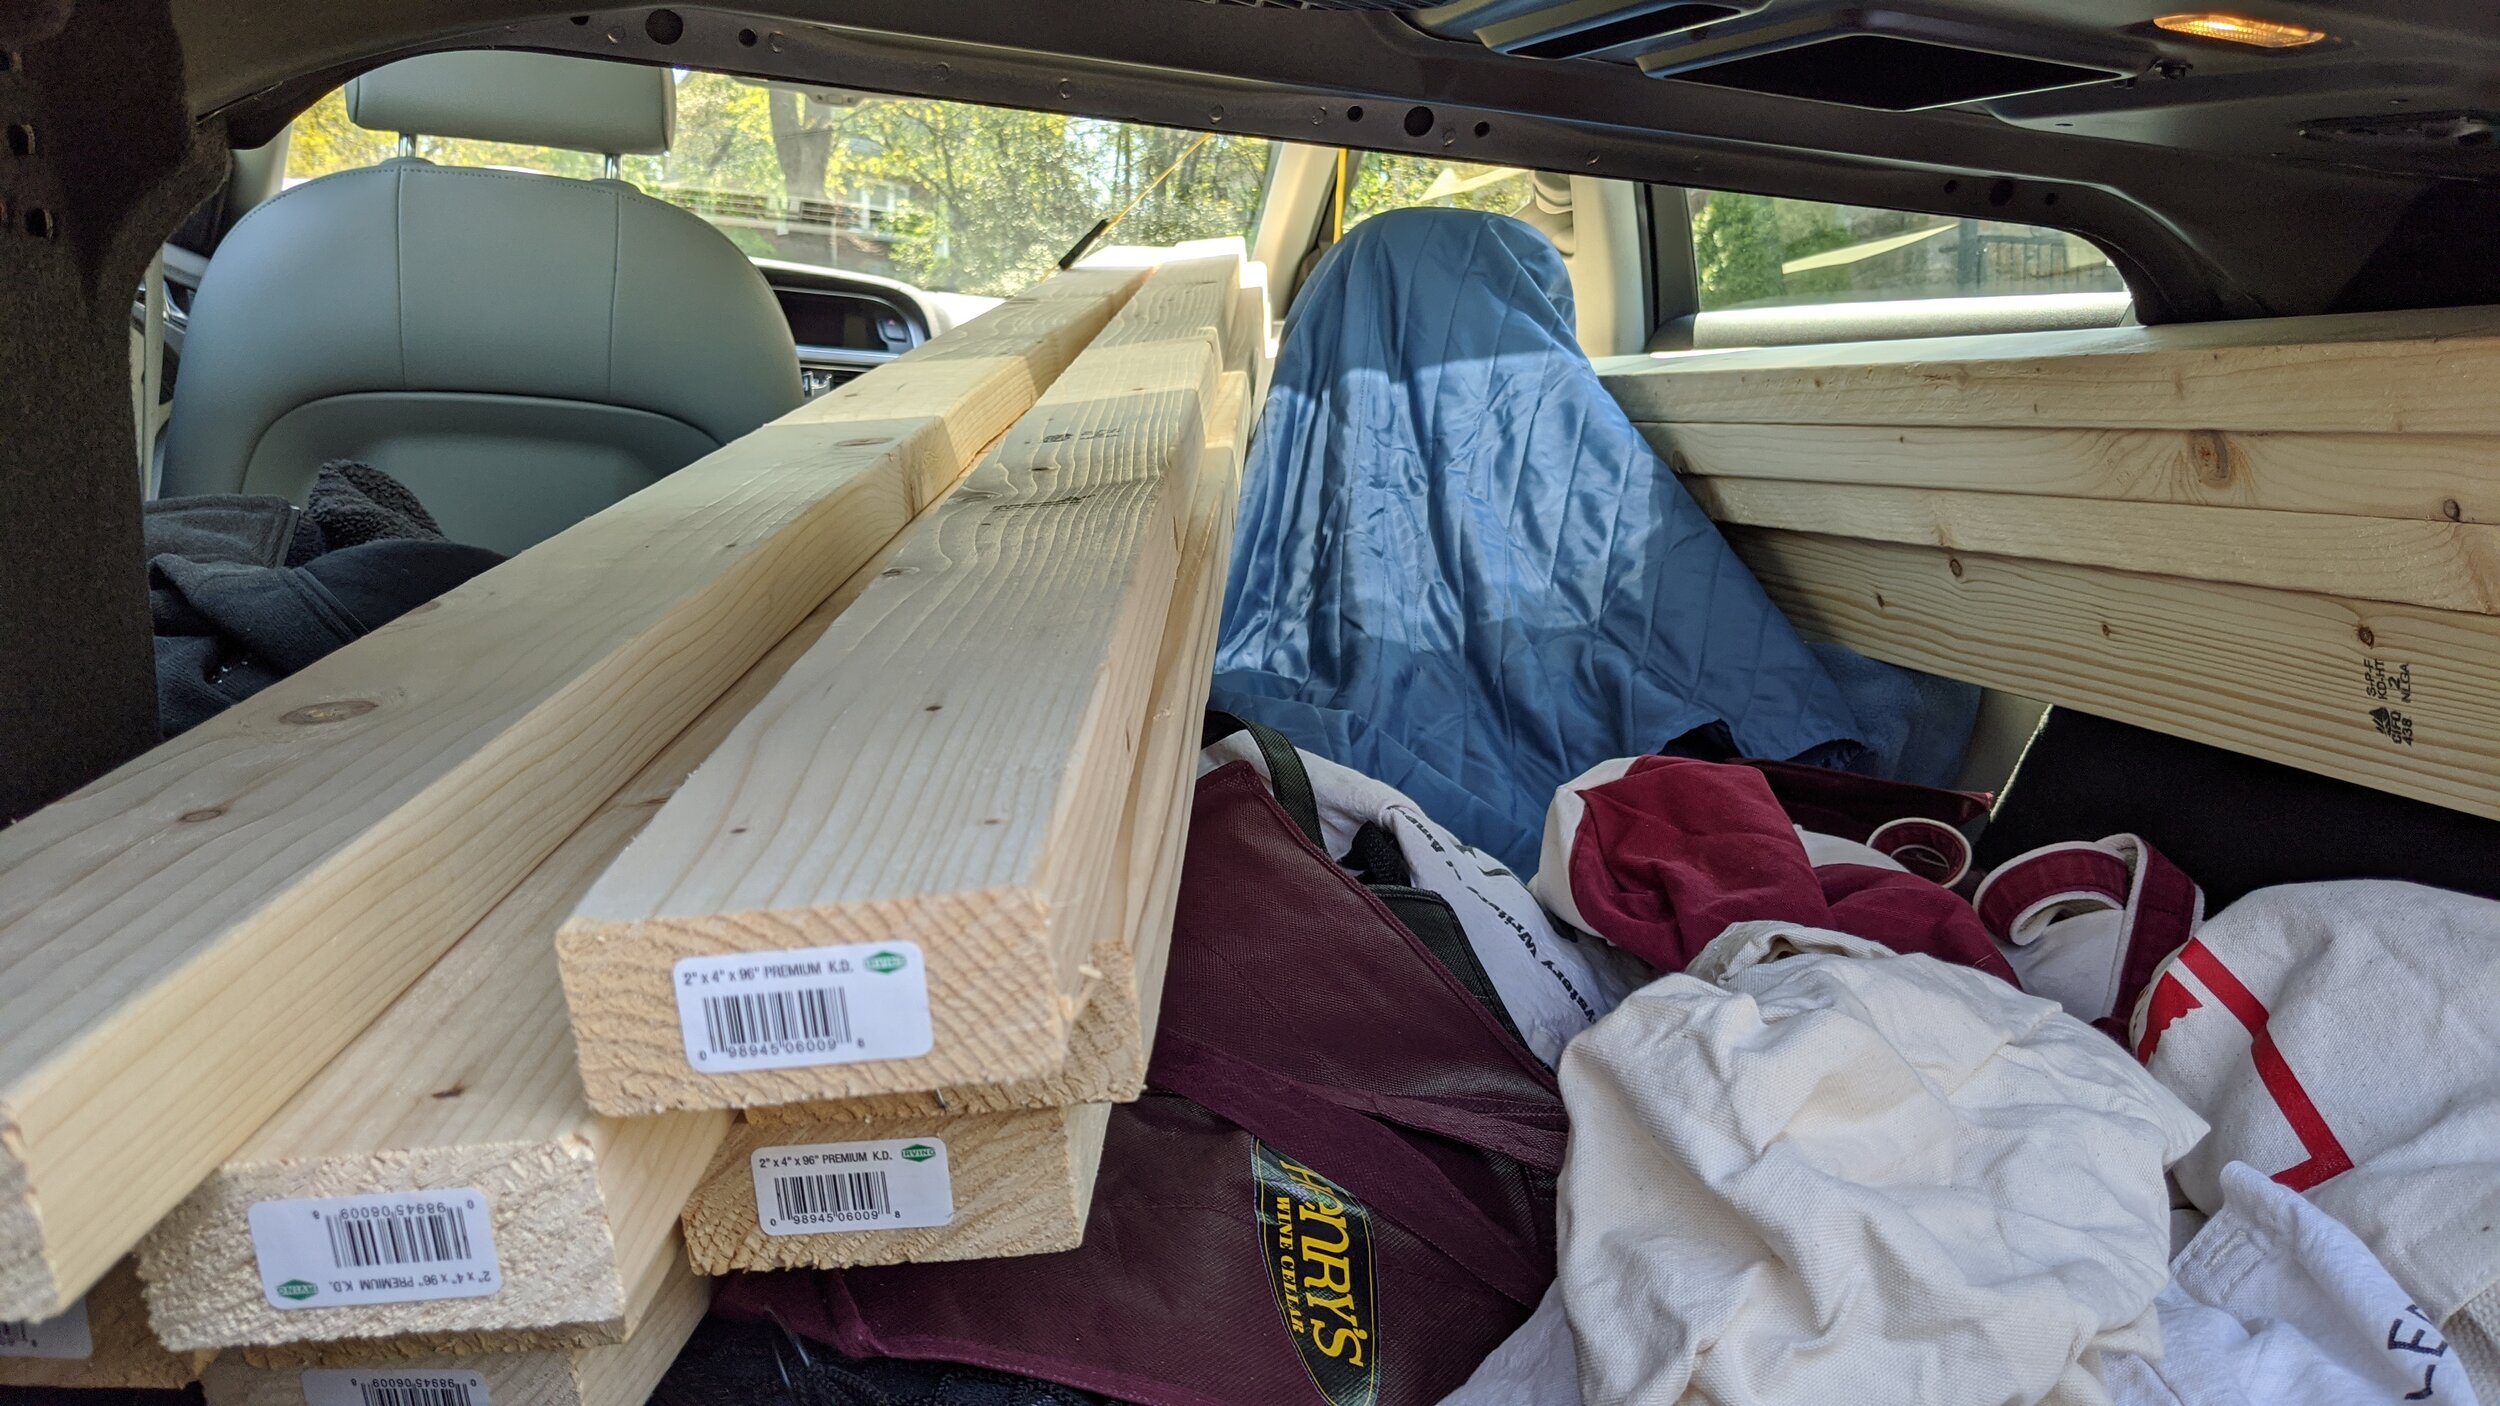
Took a few days to get around to ordering the 2x4’s for the shelf framing, and then two days to get called back for curbside pickup. I don’t mind at all since I’m in no hurry and it was way better than the staggering line outside Homedepot on a Sunday… were those folks just going to browse? Why didn’t they order for curbside pickup? Anyway it turns out that you can put a lot of 2x4x96’s into an Audi A4 with the back seats folded down and the passenger seat fully (or nearly fully) forward and reclined…

IMG_20200503_123423.jpg
IMG_20200503_121955.jpg

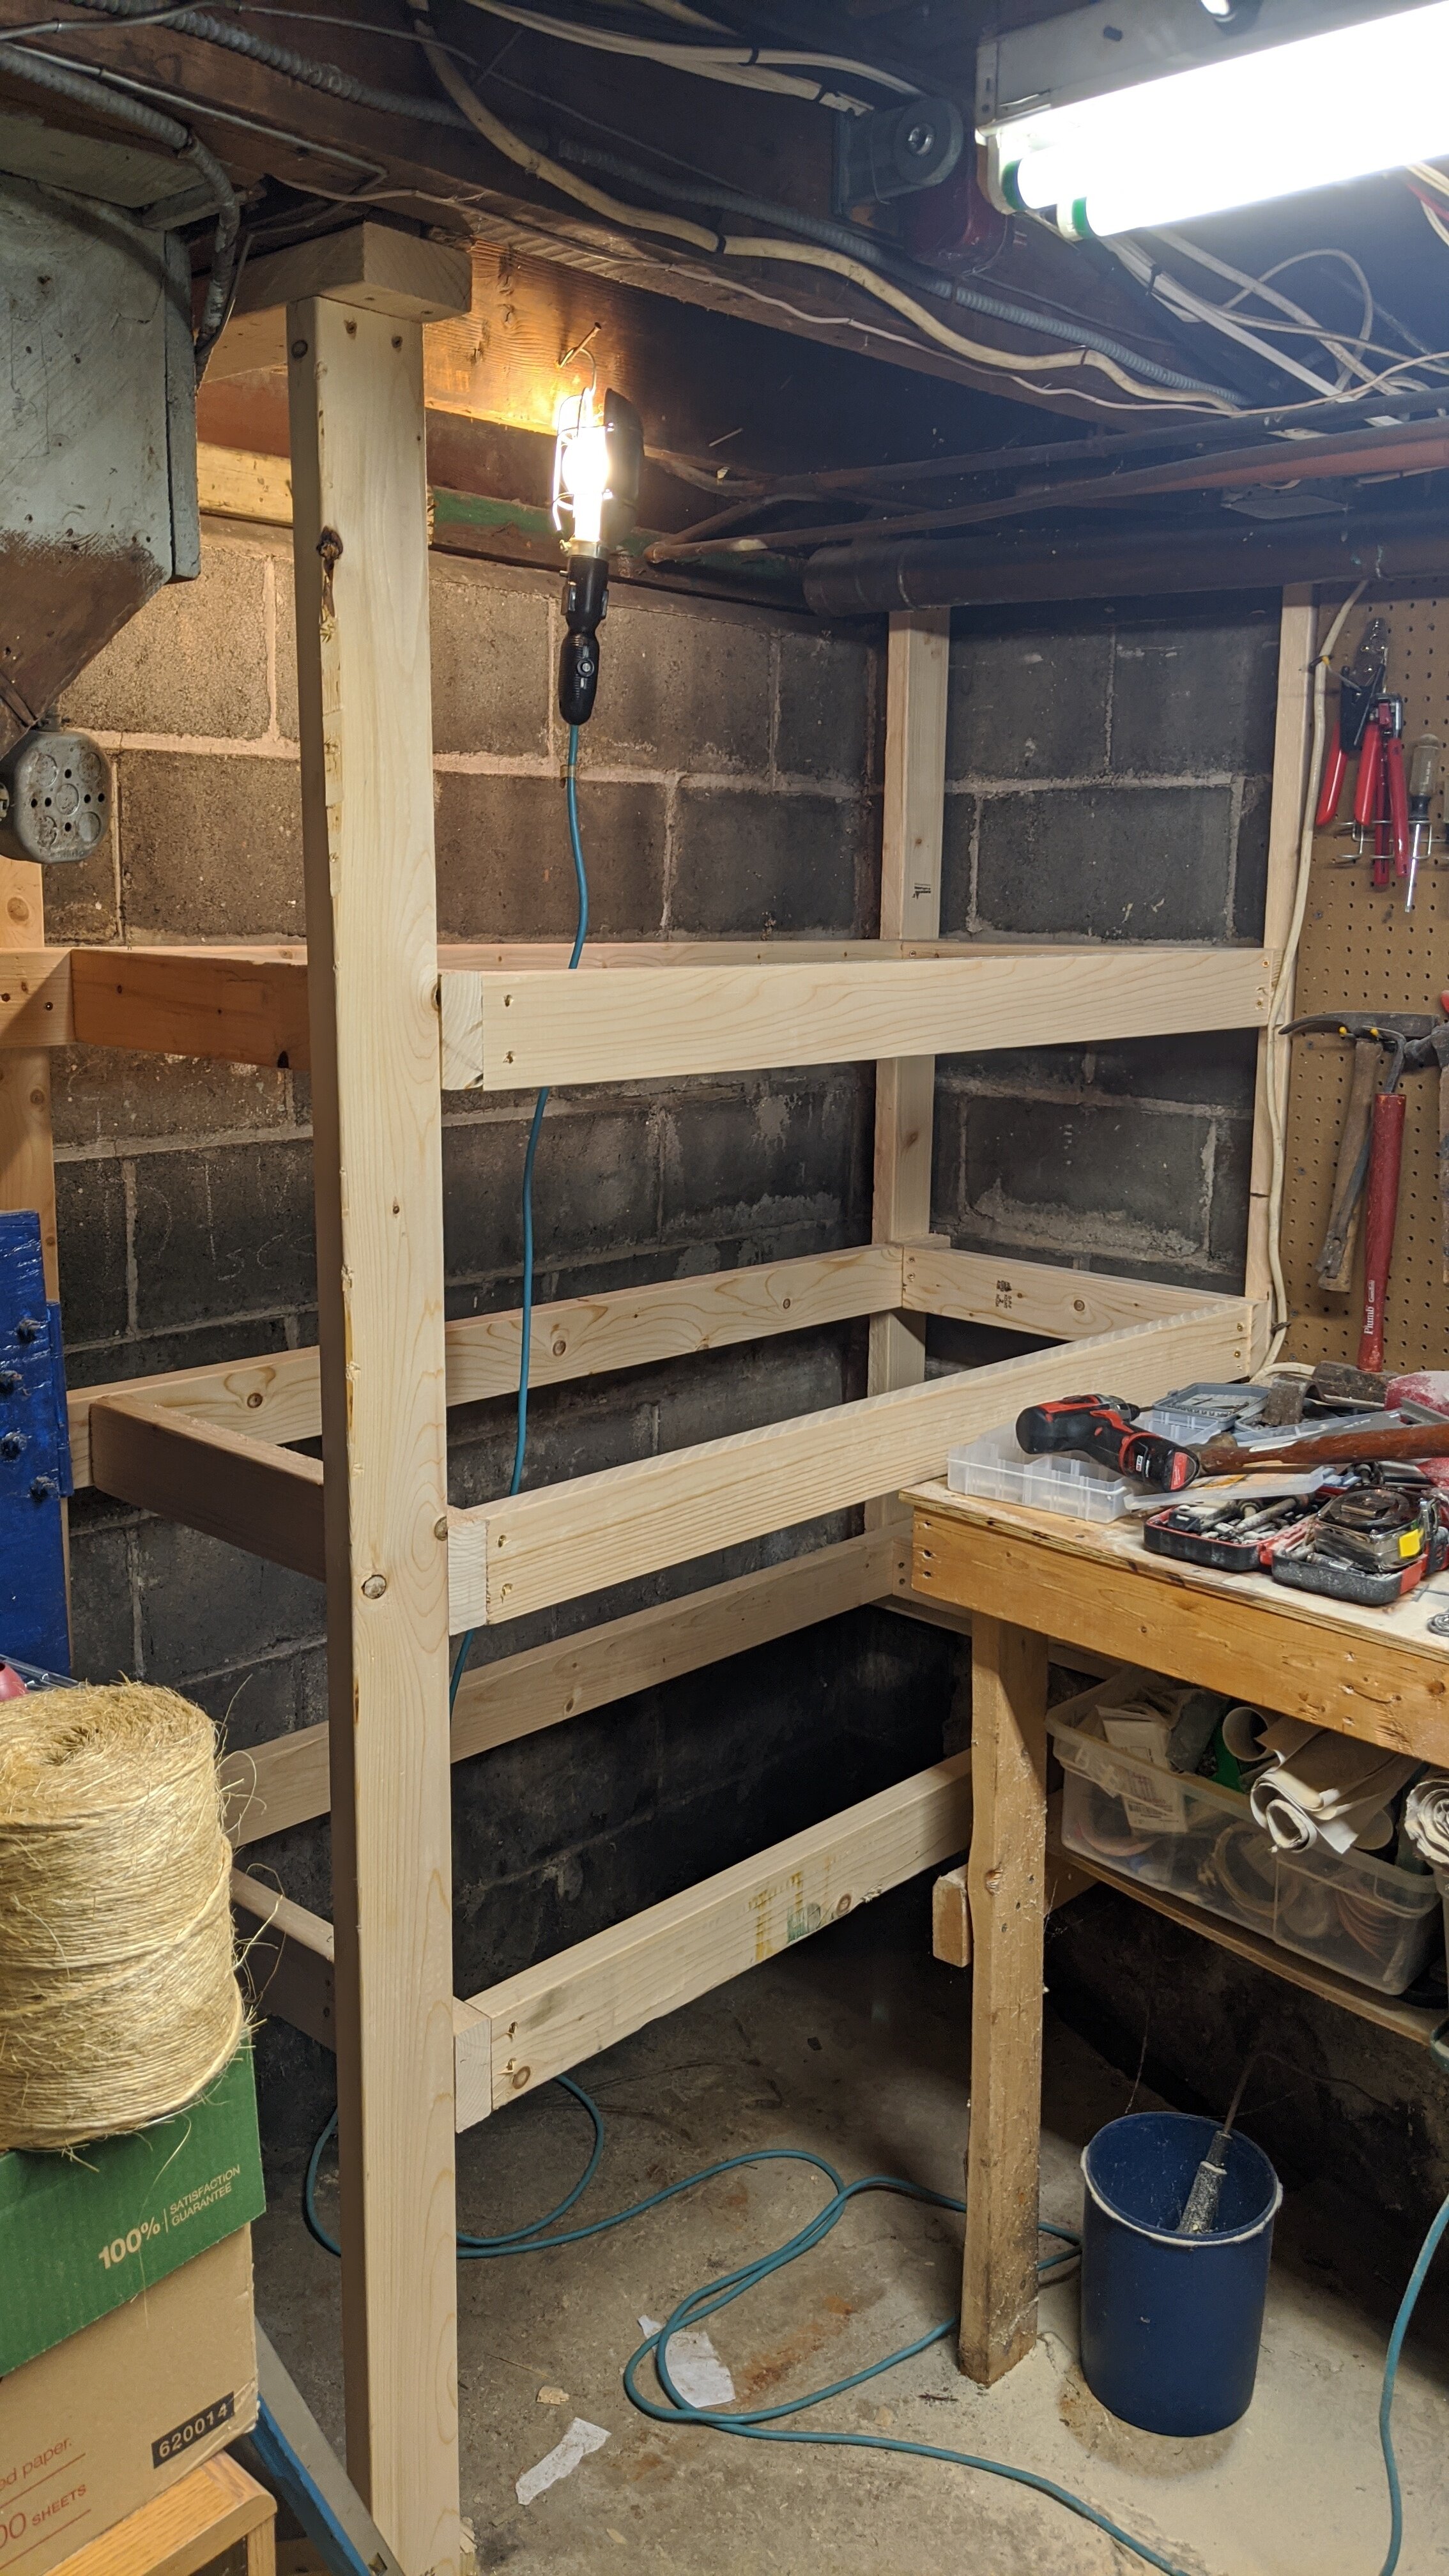
Today I was able to get all the framing for one set of shelves done. It is a bit of a challenge framing by yourself and in a blind corner, you have to think through how you’re going to reach everything to fasten it. Also I have a tiny bit of sympathy for the whiny contractors who always complain that my old (1929) house is all crooked, and the floors slope and the walls aren’t straight etc… Making level shelves with no level reference points also takes some focus. All in all though I got a lot done and I’ll be putting the plywood shelf surfaces on them tomorrow.

IMG_20200504_161722.jpg


Why not start in the basement...

When we first moved into this house twenty four years ago, we went through the usual first time homeowner spasm of house projects. There was painting, wall papering, gardening, and building storage and work space in the basement. As with many folks, our ardor for house projects waned as other priorities took over. So here I am twenty four years down the road and I’ve decided to work on building some more storage in the basement for tools and materials etc… One part of it will be next to the workbench that I built back then (and I really don’t recall why I didn’t tear out the decrepit table they had in the corner at the time) and the other will replace some rickety metal shelving I have over by the chimney base.

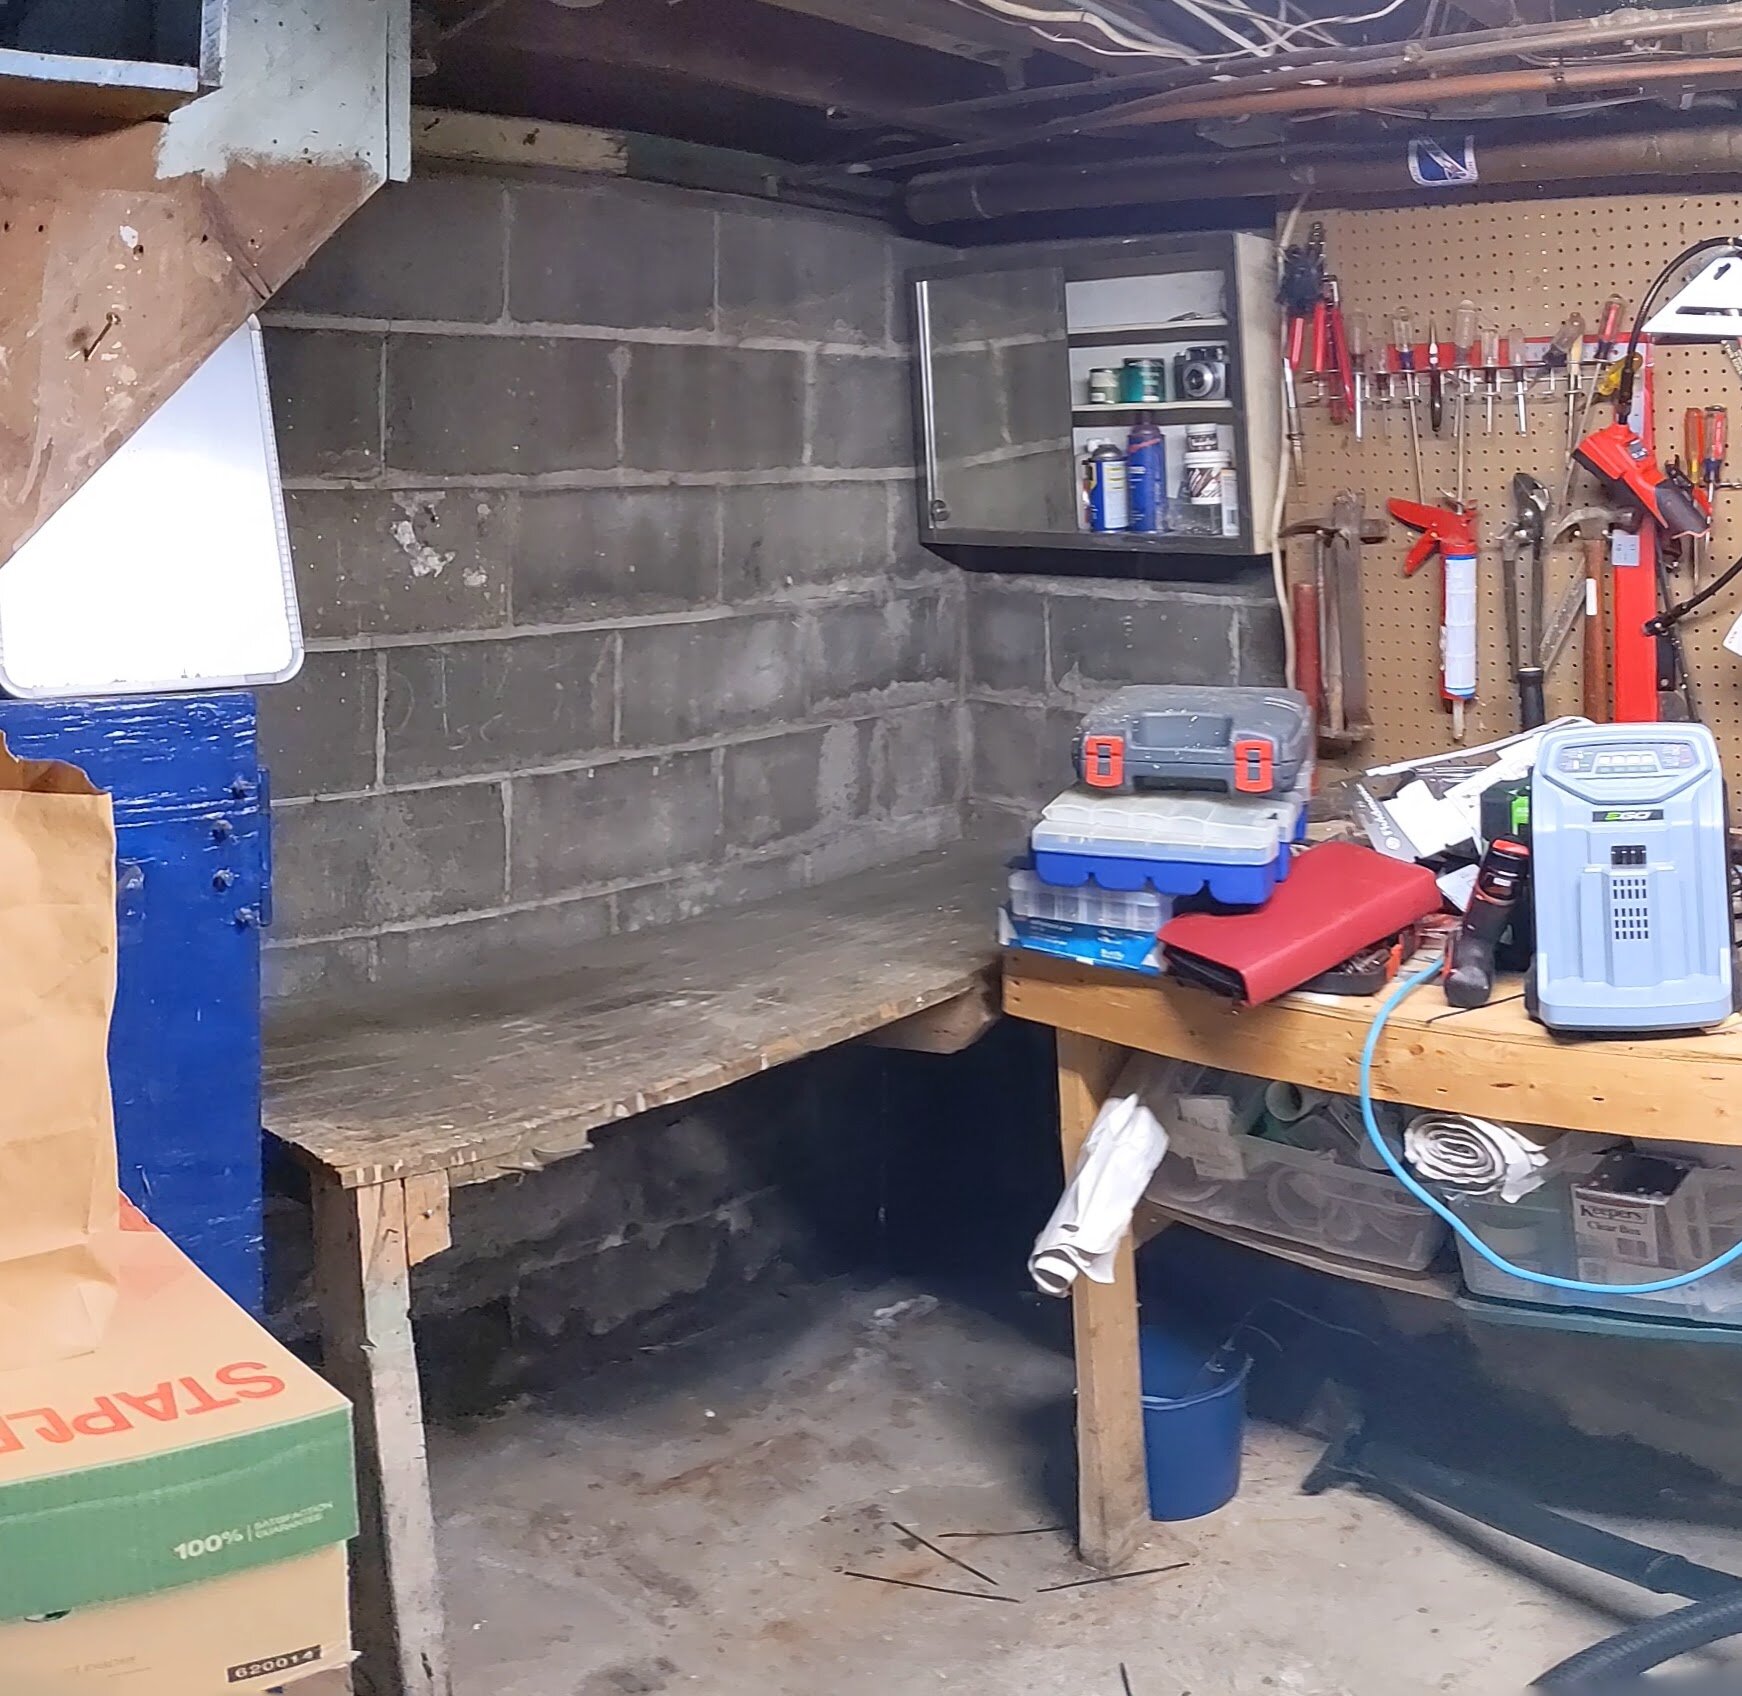
Here’s what the old table (which could be from 1929 based on the lumber) looked like:

PANO_20200501_093608.vr.jpg

You’ll have to imagine all the crap I had to clear off of it and from below it to get to this state. Here is the result of today’s efforts in breaking it down and removing it.

PANO_20200501_100513.vr.jpg

Next thing is to buy and somehow transfer the mess of 2x4’s that I need back to the house in the Audi… Maybe today, maybe tomorrow…

Baked Mac and Cheese

Ingredients


1 box of elbow macaroni

4 tablespoons of flour

2 cups of milk

½ lb gouda shredded

½ lb gruyere shredded

½ lb extra sharp cheddar shredded

1 egg

1 stick of unsalted butter

1 tablespoon granulated garlic

1 tablespoon granulated onion

1 teaspoon ground mustard

¼ teaspoon ground nutmeg

Salt

Pepper

1 cup panko crumbs


Steps

Preheat oven to 350 degrees Fahrenheit


  1. Bring 6 cups of water to a boil, add some salt and olive oil, box of elbow macaroni, cook stirring every so often for 8 minutes, drain it and set aside

  2. In a large nonstick heavy saucepan over medium high heat melt half the butter until it bubbles, add the flour, stir the roux constantly, cooking until it turns a light brown color

  3. Add the milk to the roux stirring, bring to a simmer, reduce heat slightly, add granulated garlic, granulated onion, mustard and nutmeg, stir until it thickens

  4. Add in the shredded cheese folding in so that it melts, stir in the egg, add some salt and pepper, remove from heat

  5. Melt the rest of the butter and toss the panko crumbs with it, add some more salt and pepper

  6. Add the macaroni to an ungreased 8”x8” glass baking dish, fold in the cheese mixture, top evenly with the panko mixture

  7. Place in the oven for 30 minutes, remove and let stand for 15 minutes, serve


Pork Shoulder Chili

Ingredients

2 lbs Pork Shoulder cut into ~1 inch chunks

6 cups roasted tomato, onion, and garlic puree

2 jars of roasted red peppers ( 4-5 peppers ) chopped

1 large onion chopped

4 tablespoons butter

2 tablespoons flour

Kosher salt

Fresh ground pepper

2-3 heaping tablespoons chili powder

1-2 heaping tablespoon cumin

1 teaspoon celery seed

2 oz of baker’s chocolate

1-2 teaspoon aleppo pepper

2 heaping tablespoons of dried sweet basil

1 teaspoon ground coriander

3 tablespoons cider vinegar

2 cans of small red beans, rinsed


Ingredients for hot sauce

6 jalapeno peppers

3 poblano peppers (fresh)

2 heads of garlic

3 tablespoons of tomato paste

2 tablespoons of cider vinegar

Kosher salt

Preheat the oven to 300 degrees fahrenheit.

Instructions

  1. Season Pork Shoulder with Kosher salt and fresh ground pepper and then dredge in the flour.

  2. Melt the butter on medium high heat in a large dutch oven and brown the pork on all sides until nicely brown, 6-8 minutes.

  3. Add the onions and roasted red peppers and saute, scraping the bottom and sides for 5 minutes.

  4. Add the tomato puree, chili powder, cumin, celery seed, aleppo pepper, ground coriander, basil, cider vinegar and baker’s chocolate

  5. Turn up the heat to high and bring to a simmer stirring.

  6. Once it reaches a simmer, remove from heat, cover and put in the 300 degree oven for one hour

  7. After one hour add beans, stir and return for another hour.

  8. Check that Pork is falling apart tender and then serve with Hot Sauce

Hot Sauce Instructions

  1. Stem, halve, remove seeds and ribs from the peppers.

  2. Arrange skin side up on a baking sheet

  3. Cut the bottom off of each head of garlic and place skin side up on baking sheet

  4. Drizzle peppers and garlic with olive oil

  5. Roast at 300 degrees for one hour

  6. Put peppers in food processor

  7. Squeeze out roasted garlic into food processor

  8. Add tomato paste, cider and salt and any olive oil from baking sheet ( if none add two tablespoons of olive oil)

  9. Puree for two minutes

  10. Serve with Pork Shoulder Chili

Roasted Tomato Puree with Garlic and Onion

Preheat oven to 400 degrees

Core 8-10 medium-large tomatoes and place skin side up on a baking sheet

Peel and halve two medium/large onions on sheet

Cut the bottom off of two or three heads of garlic and place on sheet

Drizzle all with olive oil

Cook for 50-60 minutes at 400 degrees

Let all cool for 15-20 minutes

Place tomatoes, and onions in food processor, pull the skins off of the tomatoes and discard

Squeeze the roasted garlic into the food processor

Puree for two minutes

Use immediately in a sauce or freeze for later use